The Third-Party Payments feature in SAP Contract Accounting (FI-CA) lets you import payment data from external systems — banks, payment service providers, or custom collections platforms — directly into a Payment Lot without manual data entry. This feature and the related integration with external systems is available for SAP S/4HANA Cloud Public Edition.
Instead of individually posting payments, you use a semicolon-delimited text file as an input to process one to many payments. The system parses it, looks up posting defaults from customizing, and creates ready-to-use Payment Lots with all required header data, payment items, and posting parameters.
Follow the file structure format described below.
File specification
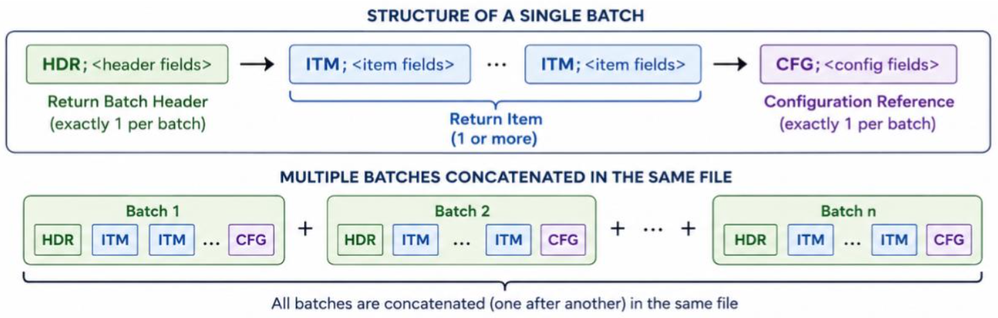
This section specifies the structure of the files. You have to follow the file structure, including the batch header (HDR), batch item(ITM) and configuration reference(CFG).
Batch Header (HDR)
Define the lot-level data. Each return batch header line is for a batch.
| Position | Field Label | Max Length | Mandatory |
| 1 | Record Type (always HDR) | 3 | Yes |
| 2 | Component of Key | 8 | No |
| 3 | Search Term | 40 | No |
| 4 | Currency | 3 | Yes |
| 5 | Additional Information | 50 | No |
| 6 | Posting Date | 10 | Yes |
| 7 | Document Date | 10 | Yes |
| 8 | Value Date | 10 | No |
| 9 | Specified Debit Total | 18 | No |
| 10 | Specified Credit Total (positive values only) | 18 | No |
| 11 | Specified Number of Items | 6 | No |
Note: Though positions 9-11 are optional, if any field of these is filled, the consistency check between the three fields needs to be conducted – header totals are compared against the actual sum of return amounts and item count of the batch. An error is raised and the batch is rejected if these values do not match. You can leave all three fields empty by using the value 0.00 for Debit and Credit Totals and 0 for Specified Number of Items to skip the consistency check.
Sample Value:
HDR;;Payment batch April;EUR;Monthly payment import;10.04.2025;10.04.2025;10.04.2025;1648.65;0.00;3Batch Item (ITM)
The batch item line represents one payment within a batch. At least one payment batch item is required for a batch.
| Position | Field Label | Max Length | Mandatory |
| 1 | Record Type (always ITM) | 3 | Yes |
| 2 | Selection Category 1 | 1 | Yes |
| 3 | Selection Value 1 | 35 | Yes |
| 4 | Selection Category 2 | 1 | No |
| 5 | Selection Value 2 | 35 | No |
| 6 | Selection Category 3 | 1 | No |
| 7 | Selection Value 3 | 35 | No |
| 8 | Payment Amount (positive = debit, negative = credit) | 16 | Yes |
| 9 | Currency (falls back to HDR currency if blank) | 5 | No |
| 10 | Value Date | 10 | No |
| 11 | Additional Information | 50 | No |
| 12 | Short Account Assignment for Transfer Postings | 4 | No |
| 13 | Post Payment on Account (X / blank) | 1 | No |
| 14 | Bank Country/Region Key | 3 | No |
| 15 | Bank Number | 15 | No |
| 16 | Bank Account Number | 18 | No |
| 17 | Bank Control Key | 2 | No |
| 18 | Account Holder Name | 60 | No |
| 19 | Bank Details Reference | 20 | No |
| 20 | Profit Center | 10 | No |
| 21 | IBAN | 34 | No |
| 22 | SWIFT / BIC | 11 | No |
| 23 | Cash Management Link ID | 32 | No |
| 24 | Note To Payee 1 | 80 | No |
| 25 | Note To Payee 2 | 80 | No |
| 26 | Note To Payee 3 | 80 | No |
| 27 | Note To Payee 4 | 80 | No |
Amount formatting rules
The minus sign – is placed directly before the number — no space. Use dot (.) as decimal separator. No thousands separator. Examples: 522.50 (debit) · -125.90 (credit)
Note To Payee — Long Text Handling
The Note To Payee supports up to 320 characters total, split across 4 fields (ITM positions 24–27), each with a maximum of 80 characters.
All 4 Note To Payee fields are optional — but all semicolons must still be present even if the fields are left empty. Do not omit trailing delimiters.
Sample values:
ITM;G;100002;;;;;1000.00;EUR;15.04.2025;Refund;;;DE;10010010;1234567890;;John Doe;REF001;PC1000;DE89370400440532013000;COBADEFFXXX;LNK00001;Refund note to payee;;;Selection Categories
In the position 2, 4 and 6 of the ITM structure holds a Selection Category code that identifies how the associated value should be interpreted. Up to 3 selection criteria can be combined per item; only the first pair (Category 1 + Value 1) is mandatory.
| Code | Description |
| B | Document |
| G | Business Partner |
| K | Contract Account |
| X | Reference Document |
| N | Payment Form number |
| Z | Payment Order |
| R | Reference for payment form |
| V | Contract |
Example:
ITM;G;100001;;;;;500.00;EUR;;… ← Select by Business Partner only ITM;G;100001;K;200001;;;500.00;EUR;;… ← Select by Business Partner + Contract Account ITM;B;9000000001;G;100001;K;200001;500.00;EUR;;… ← Select by Document + BP + Contract Account
Configuration Reference (CFG)
This line identifies the payment recipient in the external system and is used for looking up the default posting parameter from the configuration. One configuration reference line is for a batch.
| Position | Field Label | Max Length | Mandatory |
| 1 | Record Type (always CFG) | 3 | Yes |
| 2 | Payment Recipient Identifier | 30 | Yes |
| 3 | Additional Identification | 10 | No |
Note: Position 2 and 3 are used to retrieve the posting default parameters from the Define Payment Lot Specification activity (ID: 107255). These defaults — such as Company Code and House Bank — do not need to be included in the import file. For more information about this configuration, see the Prerequisite chapter.
Sample value:
CFG;RECIPIENT001;SUBKEY01Summary of File Structures
A file contains 1 to N return batches. Multiple batches are linked to the same file.

A complete file example-
As follows is a file with two payment batches:
· The first one is with a header totals check
· The second one is minimal
Sample code:
← Batch 1: 3 items, header totals validation active
← Batch 2: 1 item, no header totals, bank details on item
HDR;;Payment batch April;EUR;Monthly payments;10.04.2025;10.04.2025;10.04.2025;1648.65;0.00;3ITM;G;100001;;;;;522.50;EUR;;Payment for BP 100001;Short note to payee;;
ITM;G;100002;;;;;600.25;EUR;;Payment for BP 100002;;;
ITM;G;100003;K;200001;;;525.90;EUR;;Payment BP+CA;First part of long note to payee;Second part of note;
CFG;RECIPIENT001;SUBKEY01
HDR;;Payment batch May;EUR;Monthly payments;15.05.2025;15.05.2025;15.05.2025
ITM;G;100005;;;;;1000.00;EUR;;Refund payment;;;DE;10010010;1234567890;;John Doe;REF001;PC1000;DE89370400440532013000;COBADEFFXXX;LNK00001;Refund note;;
CFG;RECIPIENT00
Prerequisite
Define Payment Lot Specifications
Open the Define Payment Lot Specification activity (ID:107255).
Select the format type : FICA-PAYMENT-LOT

Find the example of sample values in the following screen.

Note: The fields “Our Identification in external system” and “additional Id” are imported in “CFG” segment of the imported file. See the file specification section.
Implementation
Business scenario

- (Prerequisite, if custom logic is needed) Before importing any file, the relevant Cloud BAdI extension point is implemented and published via the Custom Logic app — BADI_FKKID_EXPC_PAYMENT_LOT for payment lot import. This is where the logic to enrich or correct the mapped data according to business needs is defined.
Note: The BAdI is expected to be available in the upcoming releases.
- You have received the external files from the third-party payment provider.
- Import the file. Open the Manage Incoming Payment File (3rd-Party Payments) app (F1680).
- Select Import and choose Third-party Payment.
- Select format (Payment Lot Data), upload the file, and process.
- Immediately after this mapping — and before the mapped data is written to the staging tables — the previously implemented BAdI (if any) is automatically triggered, applying the custom enrichment or correction logic to the data.
- After the import of the payment file, process the imported file in the Process Imported Third-Party Payments app (F9000).
- Select Create
- Select Third-Party Payment: Transfer data as the job template


- In the 3rd step, select the Format Type.

- Schedule a run and you can see that the payment lot number is created in the log.
Note: If you select the Post Lot check box and you can directly process the payment order lot.

- At any stage of this process, the Monitor Third-Party Payment app (F9603) can be used as a read-only tool to view and verify the imported files, lots, items, and payees.
- Open the Monitor Third-Party Payment app.
- Select the row with imported file and the results are shown as follows


Is this blog post helpful to you? Leave your messages to let us know your thoughts.
Source link